On this page you can edit a company's profile.

General Details tab
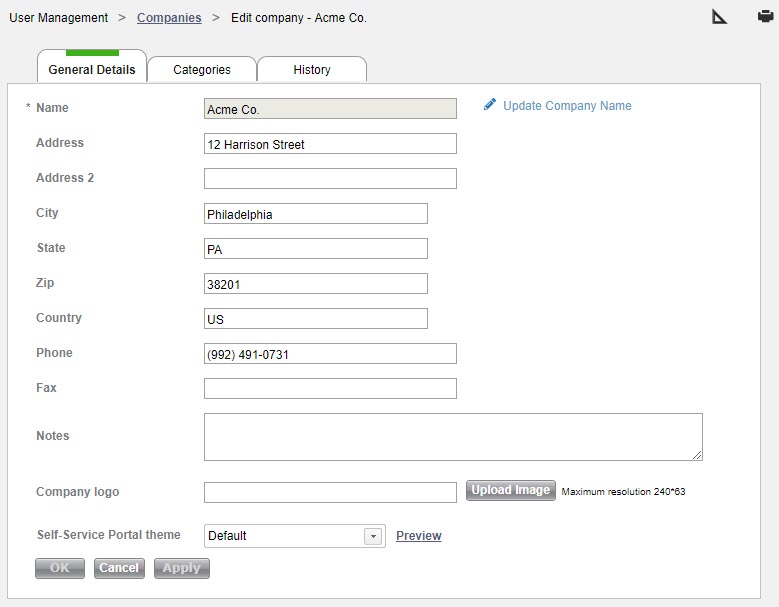
This tab contains the company's name, address, contact information, and any general notes about the company.
Name
To change the the company name, click Update Company Name, enter the new name, and click Save.
Assigning an SLA to a company
If you would like to assign a specific SLA to a company, add the Agreement field to the form by clicking ![]() , and then select the relevant agreement from the list. Service records submitted by users who are part of this company will receive the agreement selected here, unless they have a specific agreement assigned to them individually. You can configure agreements under Settings>SLA/SLM > Service Agreements.
, and then select the relevant agreement from the list. Service records submitted by users who are part of this company will receive the agreement selected here, unless they have a specific agreement assigned to them individually. You can configure agreements under Settings>SLA/SLM > Service Agreements.
Company expiration date
You may add the Expiration Date field to the company form by clicking ![]() . When a company's expiration date has passed, the company is expired. Any users who are part of this company will no longer be able to log in to SysAid. To allow them to log in again, enter a future expiration date or delete the expiration date altogether.
. When a company's expiration date has passed, the company is expired. Any users who are part of this company will no longer be able to log in to SysAid. To allow them to log in again, enter a future expiration date or delete the expiration date altogether.
Adding an unique company logo for the Self-Service Portal
Using the Logo field, you can upload a unique logo for each company you create in SysAid. The image you upload here is displayed to all end users from the selected company when they access the End-User Portal. The maximum resolution for the image is 240*63.
Self-Service Portal banner
Select the banner you want display in the Self-Service Portal for users from this company. You can view a preview of the banner by clicking Preview Banner.
Self-Service Portal theme
Select the theme you want display in the Self-Service Portal for users from this company. You can view a preview of the theme by clicking Preview Theme.
Categories tab
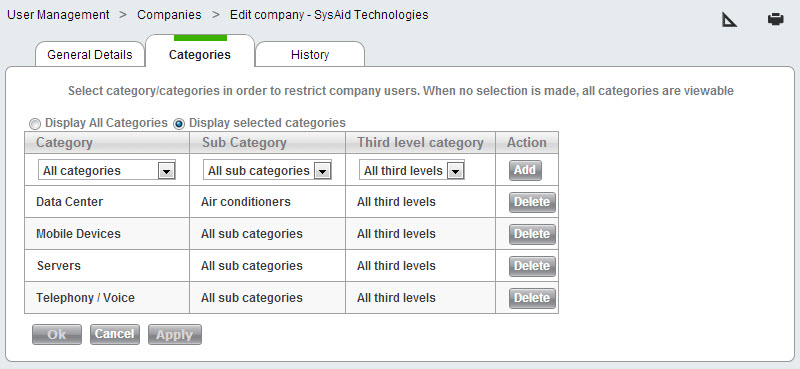
Each company set up in SysAid can have its own helpdesk categories for its end users. This tab allows you to choose which categories end users in this company can select when they submit a service record from the End-User Portal.
To add categories for a company:
- Choose a category, sub-category, and third-level category.
- Click Add.
- Repeat steps 1 and 2 until all categories that should be visible to this company's end users are selected.
- Make sure to select Display selected categories so that your settings take effect.
You may remove any category you've chosen by clicking its respective Delete button.
You can enable all categories for a company by selecting Display All Categories and then clicking OK/Apply.

History tab
This tab shows a history of all changes made to this company's profile. Click on a version number to open a snapshot of how the company profile looked at that revision.
Related Items tab
The Linked Items table shows you a list of all items related to the company. Click on any item to open a new window with details for that item.
Items added to this table also appear in the Linked Items table for the related item. For example, if you add a user to the Linked Items table on a company, you will see the company in the Linked Items table for that user.
To add linked items:
- Select the type of item you would like to add using the Add a new link, of type drop-down list.
- Choose the dependency type of the linked item.
- Click Add. This opens a list of items of the selected type.
- From the list, select one or more items using the check boxes at the left end of the rows.
- Click Select to save the selected items. This closes the list and attaches the items.
To remove linked items:
- Select one or more linked items using the check boxes.
- Click Delete from the list actions.
Mobile tab
The Mobile tab is hidden, and controls which fields appear on the Company form in the Mobile solution. To edit the fields that appear on this tab:
- On the top right of the form, click
 .
. - From the Tab list, select the Mobile tab.
- To choose which fields appear on the Mobile tab, follow the instructions found here.
The changes you've made are now reflected in the SysAid Mobile solution.