You can customize your asset types and add new ones from within SysAid.
To view and manage your asset types:
In SysAid Classic
Click the gear icon in the top right corner.
Go to Asset Management > Asset Types.
Here you’ll see a table containing all the existing asset types in your system.
In SysAid Spaces
Go to Settings > Asset Management > Asset Types.
Here you’ll see a table containing all the existing asset types in your system.
The asset types include:
DHCP Server
Laptop
Other SNMP Device
Printer
Router
Server
Smartphone
Switch
Tablet
Workstation
Firewall
Other
You can also add any asset type you need to fit your system.
Adding a new asset type
Click the Upload icon on the first line of the table to add a custom icon. If you don't add an icon, SysAid will use the same icon as for the Other asset type.
Enter the name of the asset type in the first line of the table.
Click Add.
Please note:
The recommended icon size is 32x32 px.
Editing an existing asset type
You may also change the icon used for any of the existing asset types using the appropriate Change icon button, and you can change the name of any existing asset type using the proper Change caption button. You can delete any existing asset type using the appropriate Delete button (only for the set types that you've added).
Defining default Location, Department, and Company values
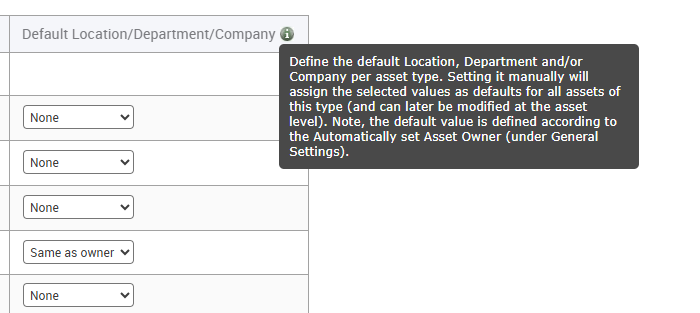
Define default values for the Location, Department, and/or Company in the relevant right-hand column.
Assign these default values to each asset type for enhanced granularity.

Select one of the following options for each asset type, as needed:
None
Same as the owner
Set Manually
Setting an asset owner
If the selected option is Set Manually, fill in the relevant fields in the matching pop-up. If no field is updated in the pop-up, the selected value will be reverted to the previous one.
If the selected option is Same as owner, the logic of defining the owner is the same as was previously used for the Automatically set Asset Owner (the user who logs in five consecutive times), which is automatically defined as the owner. Once the owner is updated, the location, department, and company are also retrieved from the same user, when available.
Once one or more of these fields are filled in and the pop-up is confirmed, hover over the tooltip (i) to see the entered values.
Click the 3-dot menu to reopen the pop-up and edit the selected values.
Please note:
Default Location, Department, and Company values configured on the Asset Types settings page are applied only when a new asset is added to the system, whether created manually or imported.
After the asset is created, any changes recorded on the asset itself, such as an owner change, can update these values. When this happens, the asset’s Location, Department, and Company are updated accordingly, and the defaults defined in the Asset Types settings are overwritten and no longer applied to that asset.
When users log in via LDAP (e.g., Okta or Azure AD), the Automatically set Asset Owner feature may not work correctly because the user is not recognized in SysAid due to duplicate names/identifiers.
To solve this, SysAid supports a Local user name field in user profiles. This allows SysAid to match assets correctly even when users have different login identifiers. There are two ways to implement this field:
Option 1: Configure in Azure/Okta (recommended)
To use this option, make sure both your administrator account and the application token account have the Attributes Assignment Administrator role:
In Azure AD or Okta, go to the “Custom security attributes” section.
Create an attribute named LocalUserName.
Assign values to users as needed.

Save your changes.
On the next user sync or import, SysAid will automatically update the Local user name field.
Option 2: Configure in SysAid (manual)
Go to Settings > User Management > End users.
Click on any user from the list.
Click the Design form triangle icon in the top-right corner.
From the Available fields list, select and add the Local user name.
Click Save.
Open a user profile and enter the local user name manually.
You will have to manually add the locat user name for each user. If you want something that requires less work. we sugget using the 2nd option.
Once updates, SysAid will recognize both the standard username and the local user name as belonging to the same user. This ensures that the Automatic calculation of the asset's owner works correctly for LDAP users.