The ADFS integration allows you to sync SysAid with your ADFS account so you can automatically log in to SysAid whenever you log in to ADFS.
Requirements
For the integration to work properly:
The ADFS server must be properly running on your system in addition to Windows Server 2012 R2 or above and SysAid version 15.2.01 or above.
Both the ADFS server and SysAid server require valid SSL certificates
You cannot activate this integration if another single-sign-on (SSO) integration has already been enabled for SysAid
Only an admin with SysAid Administrator permissions can set up this integration
Set up ADFS integration in SysAid
The first step to enabling your ADFS integration is configuring certain parameters from SysAid's ADFS integration page. Speak to your account manager to ensure that ADFS is added to your available integrations.
Please note:
In case you decide to install the integration that we do not provide our support, you hereby acknowledge and agree that you install and maintain such integration on your sole responsibility and that SysAid will have no responsibility, nor liability, with this regard.
To configure ADFS parameters in SysAid
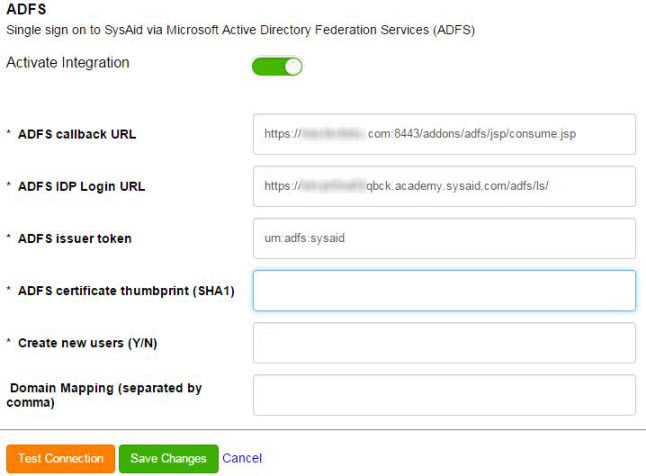
In SysAid, go to Connect > My add-ons.
Search for ADFS and click the gear icon.
In the ADFS Callback URL field, replace the text "MyAccount" with your SysAid account name.
In the ADFS IDP Login URL field, replace the text "MyAccount.MyADFS.com" with the host name of your ADFS server.
Configure your ADFS 2016 account for integration with SysAid
Once you have set up the configuration in SysAid, there are multiple processes you must perform to properly set up the SysAid integration.
If you are using ADFS 2012, see the configuration instructions below.
Add Relying Party Trust
The first process from within ADFS is adding a relying party trust to the ADFS configuration database.
To add a relying party trust
Open ADFS.
In the folder pane, navigate toADFS and right-click the Relying Party Trusts folder.
From the Right-Click menu, select Add Relying Party Trust.
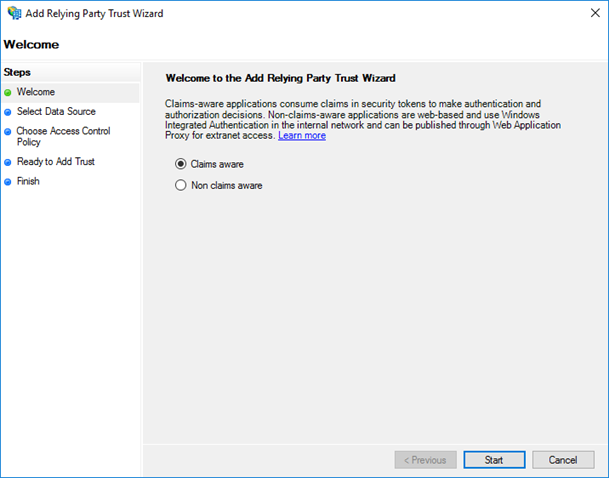
On the first page of the Add Relying Party Trust Wizard, select Claims aware.
Click Start.
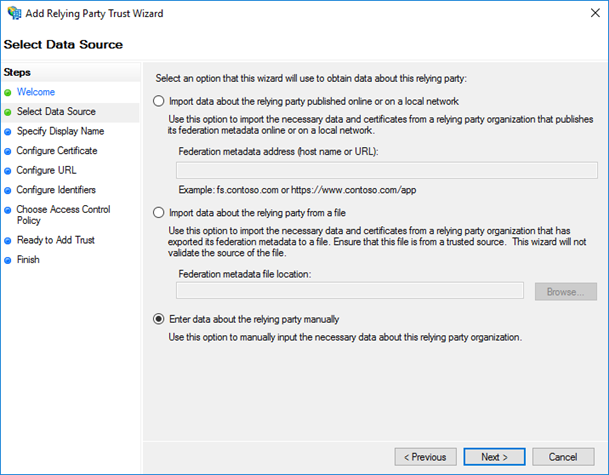
In the Select Data Source screen, select the Enter data about the relying party manually option.
Click Next.
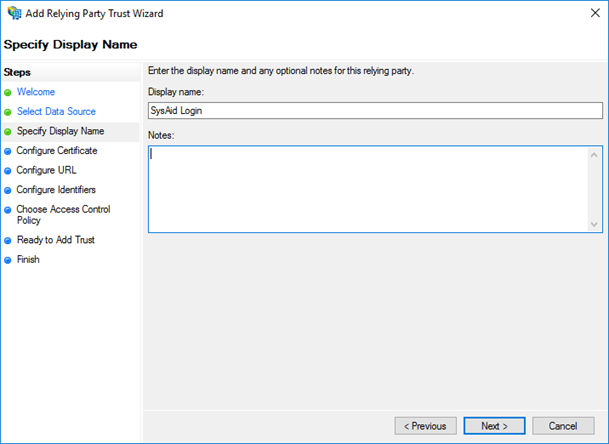
In the Specify Display Name screen, enter a display name.
Click Next.
In the Configure Certificate screen, click Next.
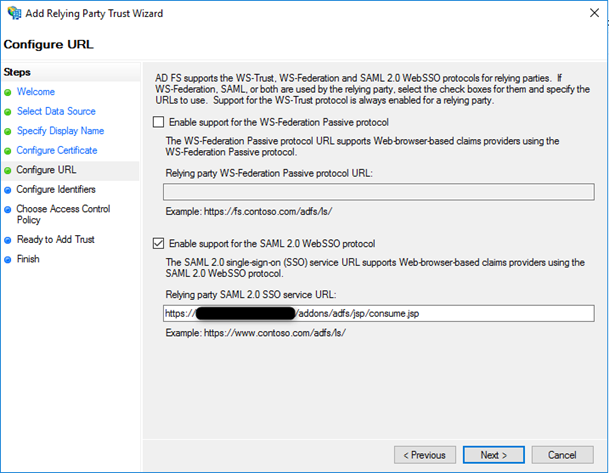
In the Configure URL screen, select the Enable support for the SAML 2.0 WebSSO protocol check box.
Copy the callback URL that you set in the SysAid ADFS Configuration screen in step 3 of the section above and paste it into the Relying Party SAML 2.0 SSO Service URL field.
Click Next.
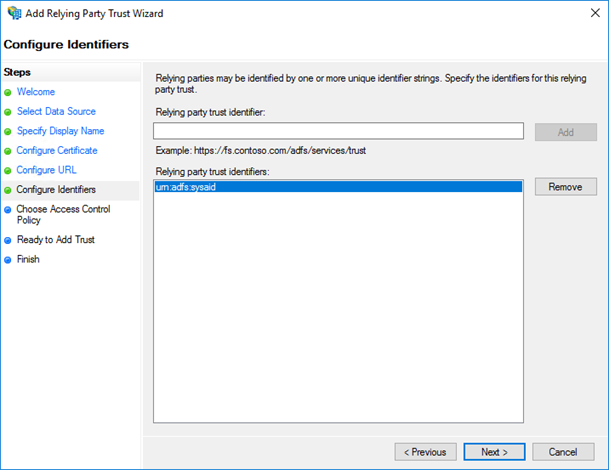
In the Configure Identifiers screen, copy the ADFS Issuer Token from the SysAid ADFS configuration screen to the Relying Party Trust Identifier field.
Click Add.
Click Next.
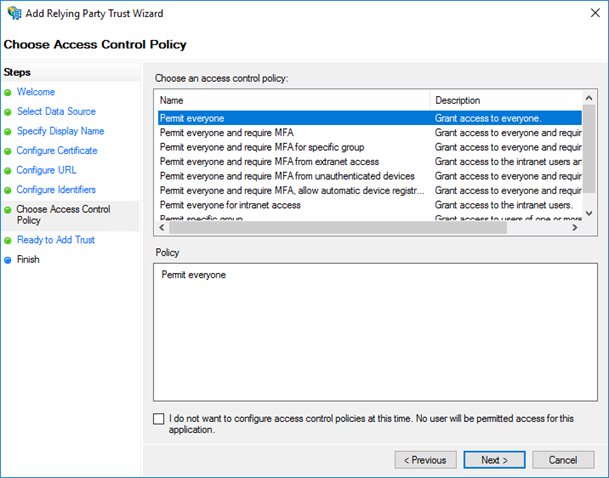
In the Choose Access Control Policy screen, select Permit Everyone.
Click Next.
In the Ready to Add Trust screen, click Next.
In the Finish screen, click Close.
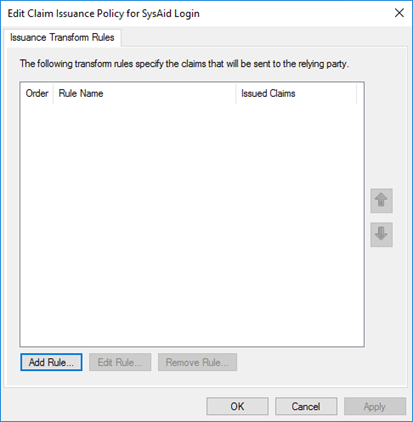
In the Edit Claim Rules for SysAid Login dialog that opens on your screen, click Add Rule.
In the Choose Rule Type screen, from the Claim Rule Template drop-down, select Send LDAP Attributes as Claims.
Click Next.
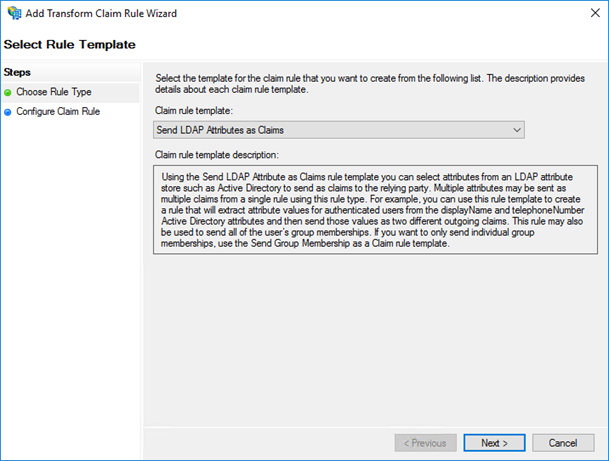
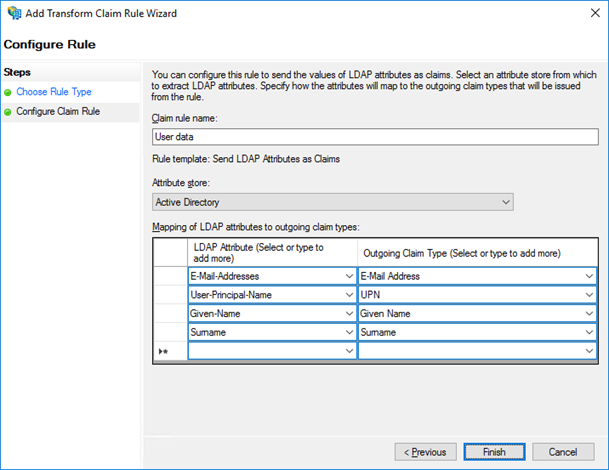
In the Configure Claim Rule screen, enter a claim rule name in the Claim Rule Name field.
From the Attribute Store drop-down, select Active Directory.
Build map of LDAP attributes (see screenshot below).
Click Finish.
Create a new claim rule
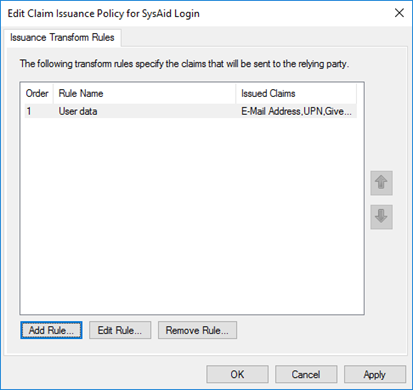
Back in the Edit Claim Rules for SysAid Login dialog, click Add Rule.
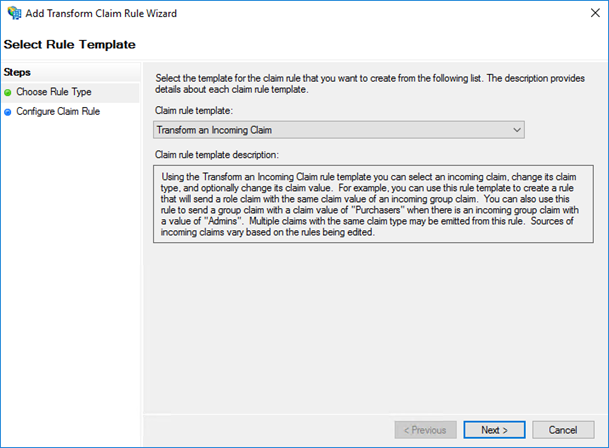
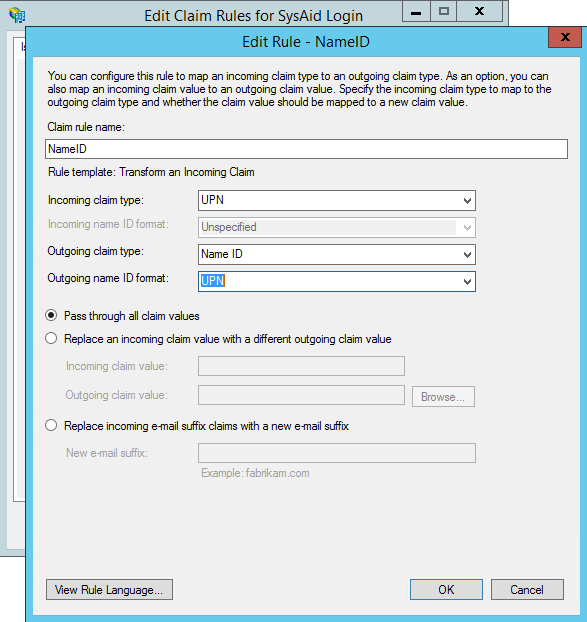
In the Choose Rule Type screen, from the Claim Rule Template drop-down, select Transform an Incoming Claim.
Click Next.
In the Edit Rule - NameID window, enter a rule name in the Claim Rule Name field.
From the Incoming Claim Type drop-down, select UPN.
From the Outgoing Claim Type drop-down, select Name ID.
From the Outgoing Name ID Format drop-down, select UPN.
Ensure that the Pass through all claim values option is selected.
Click OK.
Add ADFS thumbprint to the SysAid ADFS Configuration screen
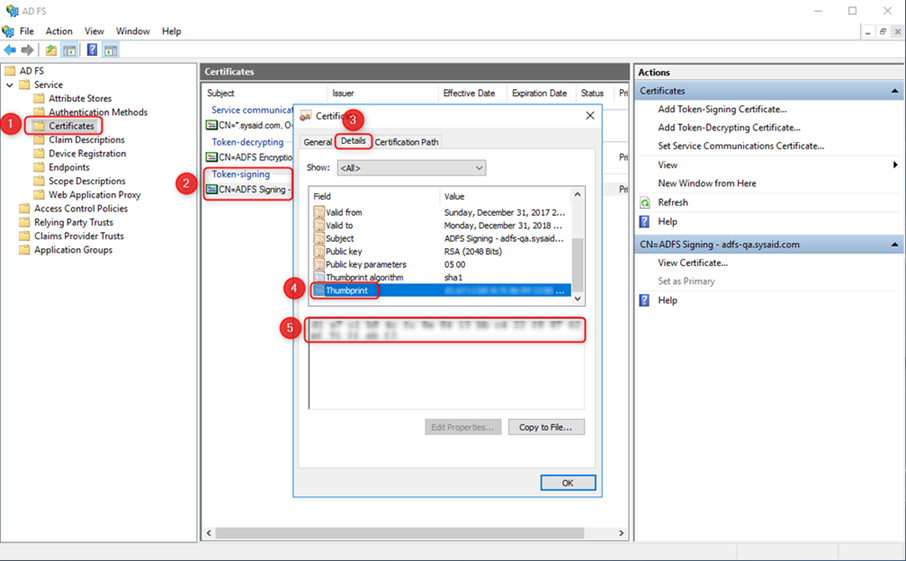
Now that you have set up the configuration on the ADFS side, you need to retrieve the ADFS thumbprint parameter and add it to the SysAid ADFS Configuration screen.
On the Main ADFS screen, select the Service > Certificates folder.
Click the Token-signing file.
In the Certificate dialog, select the Details tab.
In the field column, click Thumbprint.
Copy the Thumbprint text.
Click OK.
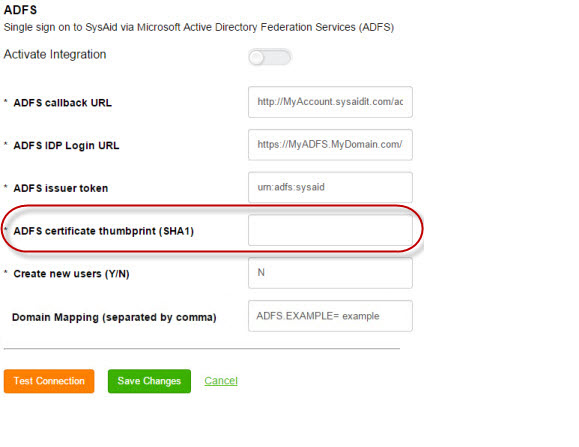
In SysAid, in the ADFS Configuration screen, paste the copied text into the ADFS Certificate Thumbprint field.
Click the Activate Integration slider.
(Optional) If you want SysAid to create new users with their ADFS IDs, Enter "Y" in the Create New Users field.
(Optional) If you selected to allow SysAid to create new users with their ADFS IDs, you can replace the ADFS domain with any name you want in the Domain Mapping field. For example, "MyDomain= MyCompany.com, MyDomain2= MyCompany.com". If you want user names to contain the ADFS domain, leave this field blank.
Click Save Changes.
Configure your browser
Once SysAid is integrated with ADFS, you need to configure your browser to allow for SSO (Single Sign On). This requires one procedure if you are running a SysAid in Internet Explorer and a separate procedure if you are running SysAid in Chrome or FireFox. You can perform one or both procedures depending on your company's requirements.
To configure ADFS SSO for Internet Explorer or Microsoft Edge
From your Windows Control Panel, select Internet Options.
In the Security tab, click Local intranet.
Click Sites.
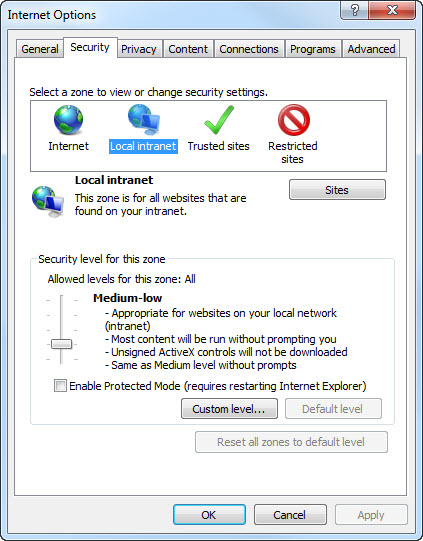
In the Local intranet, click Advanced.
Add the first part of the URL you entered in the ADFS IDP Login URL field in SysAid's ADFS Configuration screen that ends in ".com".
Click Add.
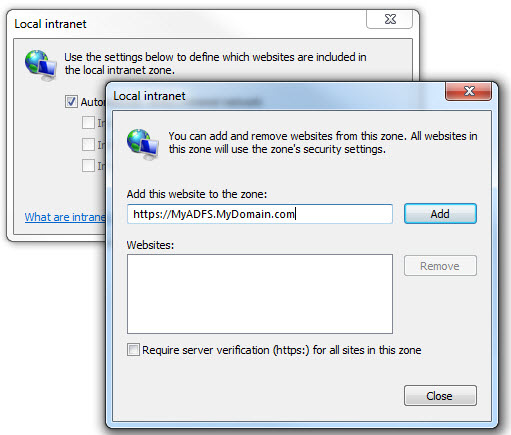
Click Close.
In the Local intranet window, click OK.
In the Internet Options window, click OK.
To configure ADFS SSO for Chrome and FireFox
If the ADFS integration is not working in Chrome or FireFox, open the Powershell command prompt on the ADFS server as an administrator and run the following commands:
# Add Chrome as a valid User Agent for NTLM authentication Set-ADFSProperties -WIASupportedUserAgents ((Get-ADFSProperties | Select-Object -ExpandProperty WIASupportedUserAgents) + "Mozilla/5.0")
# Disable Extended Protection in ADFS 3.0 Set-ADFSProperties –ExtendedProtectionTokenCheck None
This completes the SysAid ADFS integration !
When you access your SysAid login screen, you are routed to the ADFS login screen. If you are logged into ADFS, you are automatically logged in to SysAid.
If you need to manually log in to SysAid to fix your ADFS configuration, use the following URL: "<SYSAID URL>/Login.jsp?manual=true".
For further assistance, please contact SysAid Support.
Configure your ADFS 2012 account for integration with SysAid
Once you have set up the configuration in SysAid, there are multiple processes you must perform to properly set up the SysAid integration.
Add Relying Party Trust
The first process from within ADFS is adding a relying party trust to the ADFS configuration database.
To add a relying party trust
Open ADFS.
In the folder pane, navigate toADFS > Trust Relationships and right-click the Relying Party Trusts folder.
From the Right-Click menu, select Add Relying Party Trust.
On the first page of the Add Relying Party Trust Wizard, click Start.
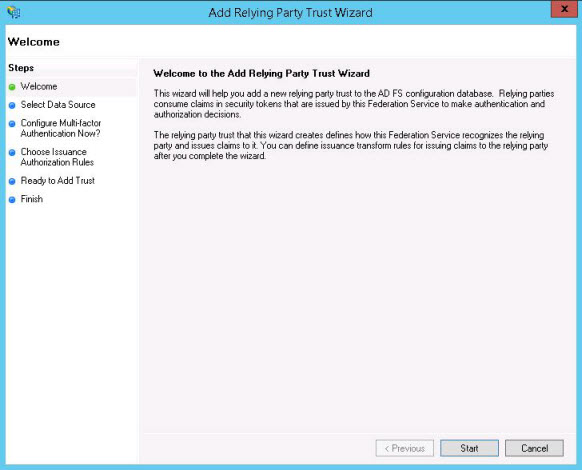
In the Select Data Source screen, select the Enter data about the relying party manually option.
Click Next.
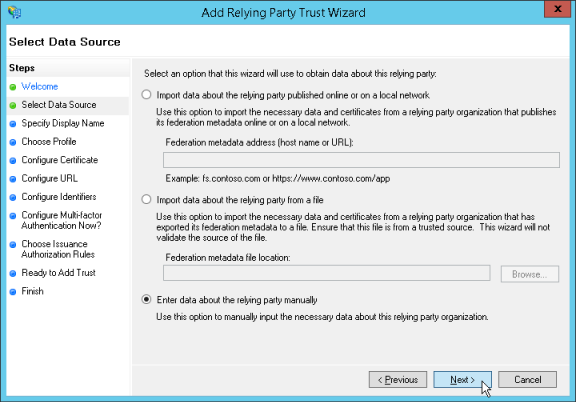
In the Specify Display Name screen, enter a display name.
Click Next.
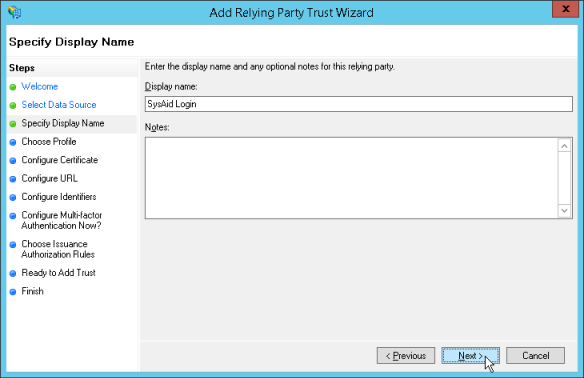
In the Choose Profile screen, select AD FS profile.
Click Next.
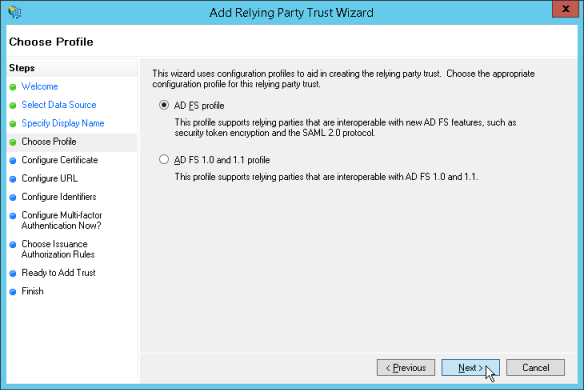
In the Configure Certificate screen, click Next.
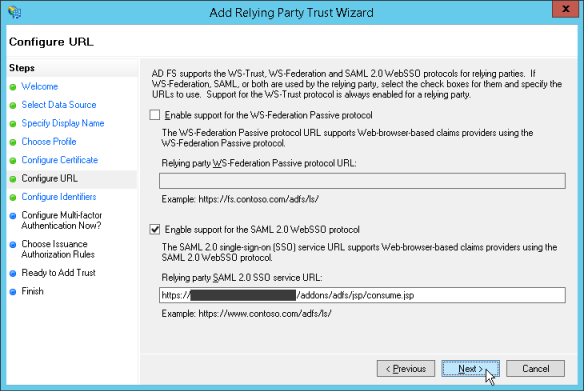
In the Configure URL screen, select the Enable support for the SAML 2.0 WebSSO protocol check box.
Copy the callback URL that you set in the SysAid ADFS Configuration screen in step 3 of the section above and paste it into the Relying Party SAML 2.0 SSO Service URL field.
Click Next.
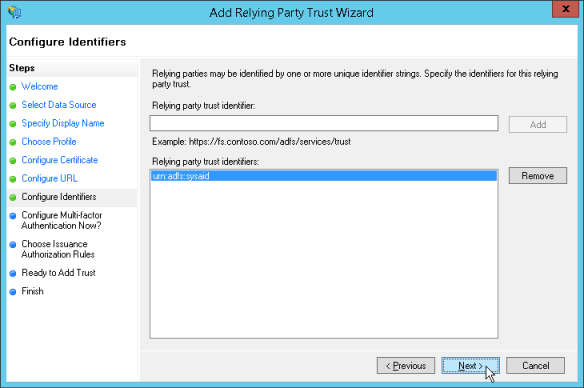
In the Configure Identifiers screen, copy the ADFS Issuer Token from the SysAid ADFS configuration screen to the Relying Party Trust Identifier field.
Click Add.
Click Next.
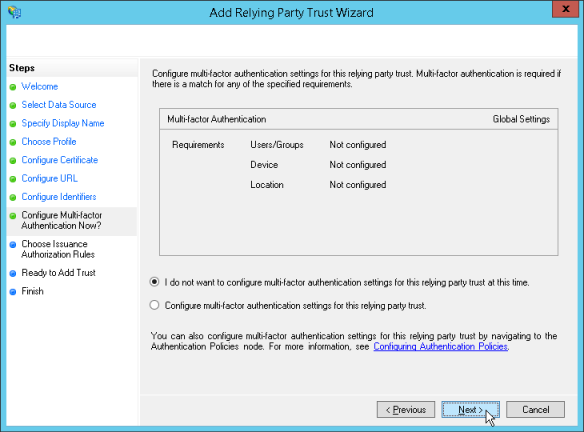
In the Configure Multi-factor Authentication Now? screen, ensure that the I do not want to configure... option is selected.
Click Next.
In the Choose Issuance Authorization Rules screen, ensure that the Permit All Users to Access This Relying Party option is selected.
Click Next.
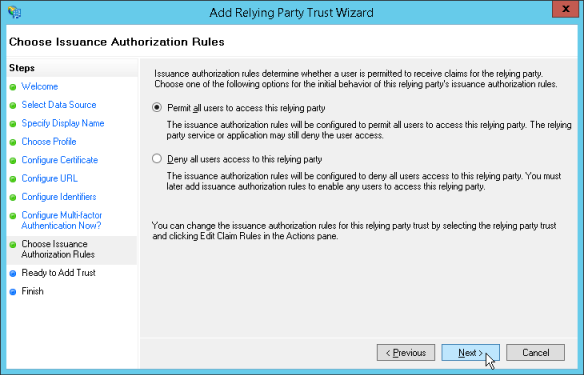
In the Ready to Add Trust screen, click Next.
In the Finish screen, click Close.
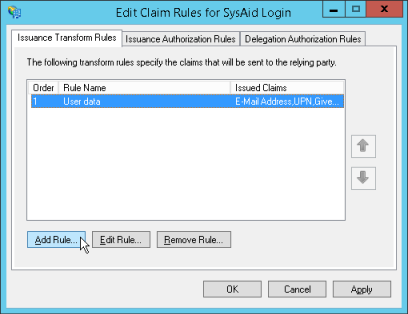
In the Edit Claim Rules for SysAid Login dialog that opens on your screen, click Add Rule.
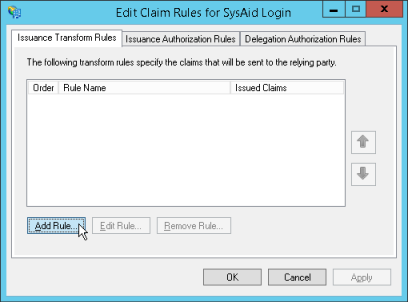
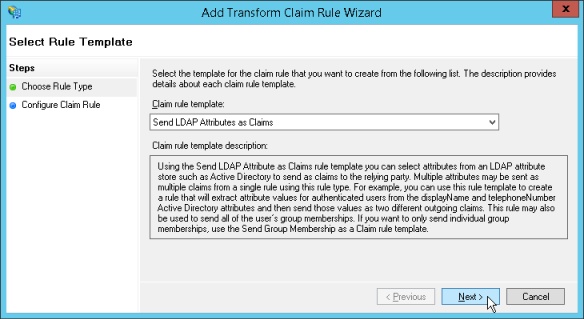
In the Choose Rule Type screen, from the Claim Rule Template drop-down, select Send LDAP Attributes as Claims.
Click Next.
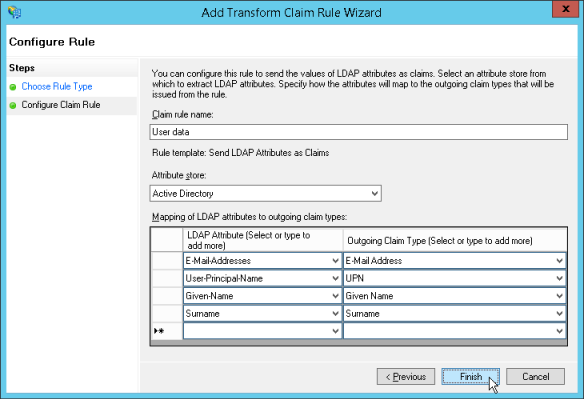
In the Configure Claim Rule screen, enter a claim rule name in the Claim Rule Name field.
From the Attribute Store drop-down, select Active Directory.
Build map of LDAP attributes (see screenshot below).
Click Finish.
Create a new claim rule
Back in the Edit Claim Rules for SysAid Login dialog, click Add Rule.
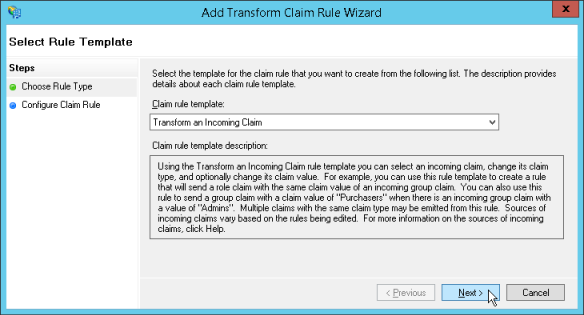
In the Choose Rule Type screen, from the Claim Rule Template drop-down, select Transform an Incoming Claim.
Click Next.
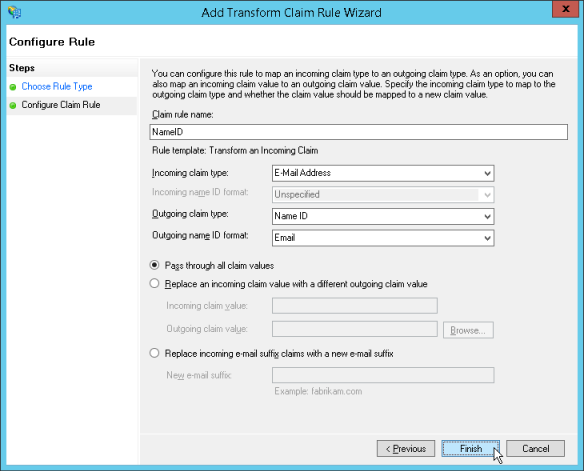
In the Edit Rule - NameID window, enter a rule name in the Claim Rule Name field.
From the Incoming Claim Type drop-down, select UPN.
From the Outgoing Claim Type drop-down, select Name ID.
From the Outgoing Name ID Format drop-down, select UPN.
Ensure that the Pass through all claim values option is selected.
Click OK.
Add ADFS thumbprint to the SysAid ADFS Configuration screen
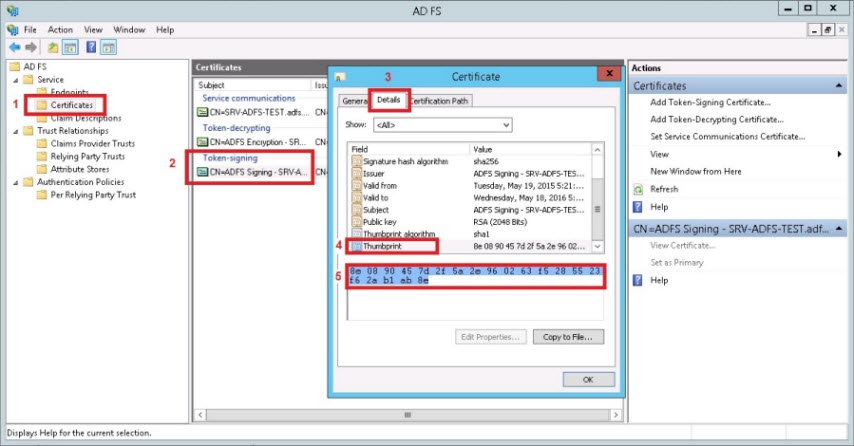
Now that you have set up the configuration on the ADFS side, you need to retrieve the ADFS thumbprint parameter and add it to the SysAid ADFS Configuration screen.
On the Main Ad FS screen, select the Service > Certificates folder.
Click the Token-signing file.
In the Certificate dialog, select the Details tab.
In the field column, click Thumbprint.
Copy the Thumbprint text.
Click OK.
In SysAid, in the ADFS Configuration screen, paste the copied text into the ADFS Certificate Thumbprint field.
Click the Activate Integration slider.
(Optional) If you want SysAid to create new users with their ADFS IDs, Enter "Y" in the Create New Users field.
(Optional) If you selected to allow SysAid to create new users with their ADFS IDs, you can replace the ADFS domain with any name you want in the Domain Mapping field. For example, "MyDomain= MyCompany.com, MyDomain2= MyCompany.com". If you want user names to contain the ADFS domain, leave this field blank.
Click Save Changes.

Configure your browser
Once SysAid is integrated with ADFS, you need to configure your browser to allow for SSO (Single Sign On). This requires one procedure if you are running a SysAid in Internet Explorer and a separate procedure if you are running SysAid in Chrome or FireFox. You can perform one or both procedures depending on your company's requirements.
To configure ADFS SSO for Internet Explorer or Microsoft Edge
From your Windows Control Panel, select Internet Options.
In the Security tab, click Local intranet.
Click Sites.

In the Local intranet, click Advanced.
Add the first part of the URL you entered in the ADFS IDP Login URL field in SysAid's ADFS Configuration screen that ends in ".com".
Click Add.
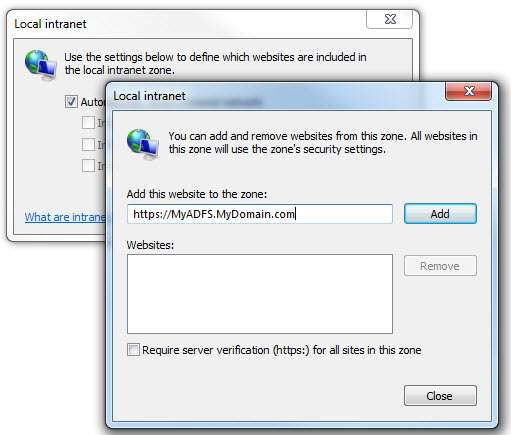
Click Close.
In the Local intranet window, click OK.
In the Internet Options window, click OK.
To configure ADFS SSO for Chrome and FireFox
In your ADFS server, open IIS Manager.
Navigate to Default Web Site > ADFS > IS.
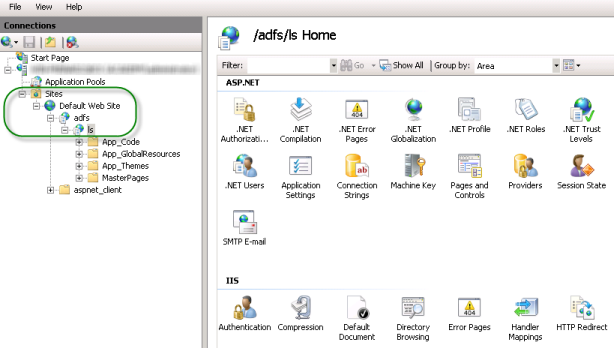
Double-Click
 .
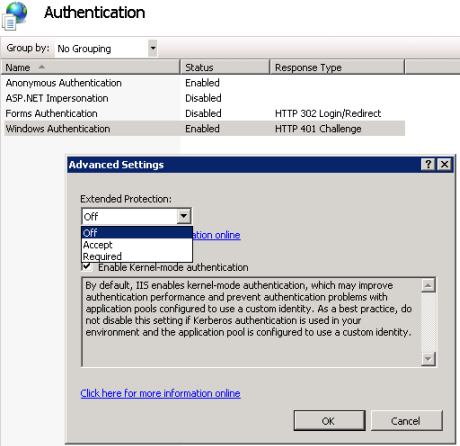
.Right-click Windows Authentication and select Advanced Settings from the Right-Click menu.
Set Extended Protection to Off.
Click OK.
This completes the SysAid ADFS integration !
When you access your SysAid login screen, you are routed to the ADFS login screen. If you are logged into ADFS, you are automatically logged in to SysAid.
If you need to manually log in to SysAid to fix your ADFS configuration, use the following URL: "<SYSAID URL>/Login.jsp?manual=true".
For further assistance, please contact SysAid Support.